 vikram@gmail.com
INTRODUCTION:-
There is something uniquely frustrating about a printer that refuses to work.
You have an important document. A deadline is approaching. You plug in the cable, click print, and absolutely nothing happens. The printer sits there silently. The computer pretends the printer does not exist. And you are left staring at a blinking cursor wondering what went wrong.
This situation is extraordinarily common — and almost always completely avoidable.
Knowing exactly how to connect a printer to your computer correctly, completely, and confidently eliminates this frustration permanently. Whether you are setting up a brand new printer fresh from the box, reconnecting an old printer to a new computer, or finally figuring out the wireless printing setup you gave up on months ago — this guide walks you through every step, every method, and every solution with absolute clarity.
By the final paragraph, you will have successfully printed your first page and understand your printer well enough to troubleshoot any problem that ever arises in the future.
Understanding Your Printer Before You Begin
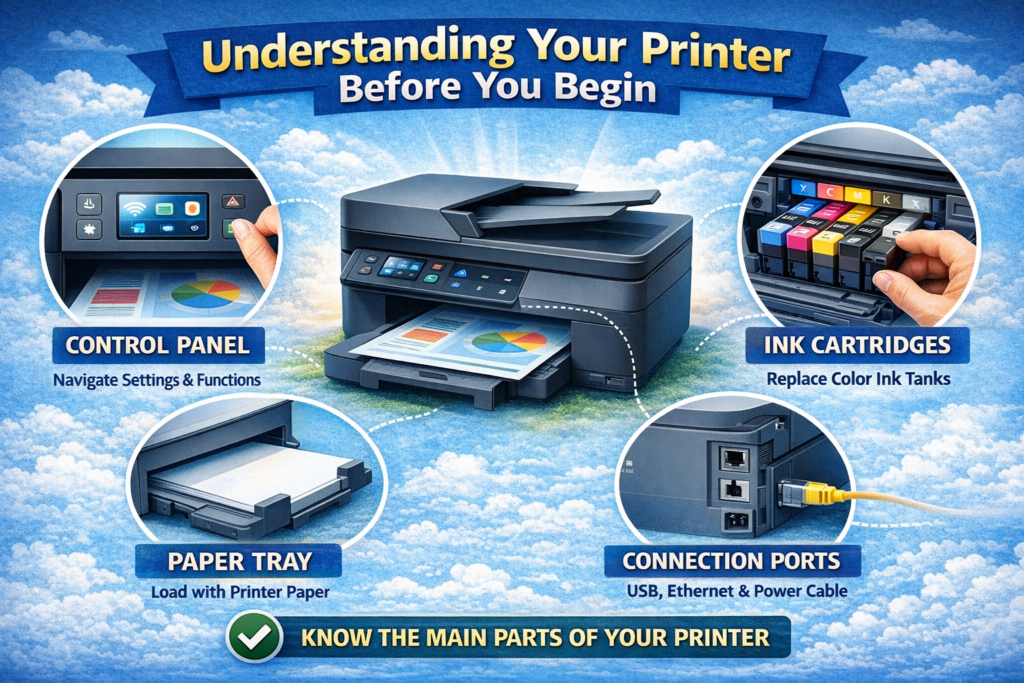
Before rushing to connect a printer with cables or Wi-Fi settings, spending two minutes understanding exactly what type of printer you have saves significant time and frustration later.
Modern printers fall into two broad categories that determine everything about how setup works.
Inkjet printers use liquid ink cartridges to produce output and handle everything from basic text documents to high-quality photographs. They are the most common type found in homes and small offices — affordable to purchase, widely compatible, and capable of excellent color output. Popular examples include Canon PIXMA series, Epson EcoTank series, and HP DeskJet series.
Laser printers use toner powder and heat rather than liquid ink, producing sharp, fast output that is particularly excellent for high-volume text document printing. They cost more upfront but significantly less per page over time. Common examples include HP LaserJet series, Brother HL series, and Canon imageCLASS series.
Beyond the printer type, identify your connection method — how this particular printer is designed to connect a printer to computers and networks. Three options exist in the modern market.
USB connection uses a physical cable running directly from the printer to your computer — the simplest, most reliable connection method requiring no network configuration whatsoever.
Wireless connection uses your home or office Wi-Fi network to allow the printer to communicate with computers, smartphones, and tablets anywhere within network range — the most flexible and convenient modern option.
Network connection uses a physical Ethernet cable connecting the printer directly to your router — preferred in offices where multiple computers need reliable simultaneous access to a shared printer.
Check the back and sides of your printer for available ports and look at the printer’s front panel for Wi-Fi indicator lights to identify which connection methods your specific model supports.
Method One — USB Cable Connection
The USB cable method is the easiest and most foolproof way to connect a printer to a Windows computer. Modern Windows operating systems handle most of the setup automatically, often without requiring any manual driver installation at all.
What You Need
A USB printer cable — specifically a cable with a standard USB Type-A connector on one end (the flat rectangular end that plugs into your computer) and a USB Type-B connector on the other end (the square-shaped end that plugs into the printer). Most printers include this cable in the box, but if yours did not, they are inexpensive and widely available.
Step One — Prepare Both Devices
Before connecting any cables, make sure both your computer and printer are completely powered off. Connecting USB devices while powered on rarely causes serious problems, but starting from a powered-off state ensures the cleanest possible initial connection and driver installation process.
Step Two — Connect the Cable
Plug the square USB Type-B end of the cable firmly into the USB port on your printer — typically located on the back panel. Plug the flat USB Type-A end into any available USB port on your computer. Both connections should feel secure without requiring excessive force.
Step Three — Power On the Printer First
Turn on your printer before turning on your computer. This sequence allows Windows to detect the connected printer during its startup process, which often produces smoother automatic driver installation than connecting after Windows has already fully loaded.
Step Four — Allow Windows to Detect and Install
Turn on your computer and log into Windows. Within thirty to sixty seconds of reaching the desktop, Windows will typically detect the newly connected printer automatically. A notification may appear in the bottom-right corner of your screen indicating that Windows is setting up the device and installing drivers.
Watch for the notification “Device setup complete” — this confirms that Windows has successfully identified your printer and installed the necessary drivers to make it function. Your printer is now ready to use.
Step Five — Verify in Settings
Open Windows Settings by pressing Windows Key plus I. Navigate to Devices, then click Printers and Scanners. Your printer should appear in the list of installed printers. Click on it to verify it shows as Ready status — confirming the connection is active and functioning correctly.
If your printer does not appear automatically within two minutes of connecting, proceed to the driver installation section later in this guide.
Method Two — Wireless Wi-Fi Connection
Wireless setup allows you to connect a printer to your entire home or office network — meaning every computer, smartphone, and tablet on that network can print without any physical cable connection. This is the setup most people want for modern convenience, and while it involves a few more steps than USB, the process is straightforward when followed correctly.
Prepare Your Printer for Wireless Setup
Before your computer can find and connect a printer wirelessly, the printer itself must first join your Wi-Fi network. This happens through the printer’s own control panel — the screen and buttons on the front of the printer itself.
The exact navigation varies between printer brands and models, but the general path is consistent across virtually all modern wireless printers.
Press the Home or Menu button on your printer’s front panel to access the main menu. Look for and select Network Settings, Wireless Setup, Wi-Fi Setup, or Wireless LAN Setup — the exact wording differs by manufacturer but the concept is identical.
Select Wireless Setup Wizard or Wi-Fi Setup Wizard from the network menu. Your printer will scan for available Wi-Fi networks and display a list of detected networks on its screen.
Scroll through the list to find your home or office Wi-Fi network name — the same network your computer uses. Select your network name and enter your Wi-Fi password carefully when prompted. Wi-Fi passwords are case-sensitive, so ensure capitals and lowercase letters match exactly.
After entering the password and confirming, your printer will attempt to connect to the network. This process typically takes fifteen to thirty seconds. A successful connection is confirmed by a Wi-Fi indicator light becoming solid (rather than flashing) on the printer’s front panel, or by a confirmation message appearing on the printer’s display screen.
Your printer is now connected to the Wi-Fi network. The next step is telling your Windows computer to use it.
Add the Wireless Printer to Windows
Open Windows Settings using Windows Key plus I. Click Devices, then select Printers and Scanners from the left sidebar.
Click the Add a printer or scanner button at the top of the Printers and Scanners page. Windows will begin scanning your network for available printers — this scanning process takes approximately fifteen to thirty seconds.
Your wireless printer should appear in the detected devices list. Click on its name to select it, then click Add device. Windows will download and install the appropriate drivers automatically, which may take one to three minutes depending on your internet connection speed.
When installation completes, your printer appears in the Printers and Scanners list with Ready status — confirming the wireless connection is active and your computer can communicate with it successfully.
Method Three — Using the Manufacturer’s Installation Software
While Windows handles basic printer setup automatically in many cases, installing the full manufacturer software package unlocks additional features — scanning software, ink level monitoring, print quality settings, maintenance tools, and model-specific utilities — that Windows automatic installation does not include.
This method is recommended for anyone who wants complete functionality from their printer rather than just basic printing capability.
Download the Official Software
Identify your printer’s exact model number — printed on a label on the front or bottom of the printer, and also included in your printer’s documentation box.
Open your web browser and navigate to your printer manufacturer’s official support website:
HP printers: support.hp.com Canon printers: usa.canon.com/support Epson printers: epson.com/support Brother printers: support.brother.com
Enter your exact model number in the search field on the support page. Navigate to the Drivers and Downloads section for your model. Select your operating system — Windows 10 or Windows 11 — and download the full software package rather than just the basic driver file.
Run the Installation
Locate the downloaded installer file in your computer’s Downloads folder and double-click it to begin installation. Follow the on-screen prompts — the installation wizard will guide you through the complete setup process including connection method selection, network configuration if choosing wireless, and test page printing to confirm successful setup.
Manufacturer installation software frequently produces more reliable results than Windows automatic detection, particularly for wireless printer connections and for older printer models.
Installing Printer Drivers Manually
If Windows does not automatically detect your printer and the manufacturer software installation is unavailable, manual driver installation through Windows Device Manager resolves the majority of detection failures.
Press Windows Key plus X and select Device Manager from the menu. Look for your printer in the device list — it may appear under Printers or under Other devices with a yellow warning triangle indicating an unrecognized device.
Right-click on the printer entry and select Update driver. Choose Search automatically for drivers — Windows will search online for the appropriate driver and install it automatically if found.
If automatic search fails, return to the manufacturer’s support website, download just the driver file (not the full software package), then repeat the Update driver process and choose Browse my computer for drivers — navigating to the location where you saved the downloaded driver file.
Printing Your First Test Page
With your printer successfully connected and appearing in Windows with Ready status, printing your first page confirms everything is working correctly end to end.
Using Windows Test Print
Open Windows Settings, navigate to Devices, then Printers and Scanners. Click on your printer name in the list. Click Manage. Click Print a test page.
Windows sends a standard test page to your printer immediately. This page prints within seconds if the connection is fully functional, confirming that communication between your computer and printer is working perfectly.
Printing a Document
Open any document — a Word file, a PDF, a webpage, anything printable. Press Ctrl plus P to open the Print dialog. Verify that your printer’s name appears in the Printer selection field at the top. If multiple printers are listed, click the dropdown and select your correct printer.
Review the basic settings — number of copies, page range, orientation — then click Print. Your document sends to the printer and printing begins within seconds.
Congratulations. You have successfully connected your printer and printed your first page.
Setting Your Printer as Default
If you own multiple printers or if Windows selected a different default printer during installation, setting your preferred printer as the default ensures every print job goes to the right device automatically without manual selection each time.
Open Settings, go to Devices, then Printers and Scanners. Scroll down and turn off the toggle labeled Let Windows manage my default printer — this gives you manual control over the default selection. Return to the printer list, click your preferred printer, click Manage, then click Set as default. A green checkmark will appear beside your printer name confirming default status.
Troubleshooting Common Connection Problems
Even following every step correctly, occasional issues arise. These solutions resolve the most common problems people encounter when trying to connect a printer to a Windows computer.
Printer not detected during wireless setup: Confirm your printer and computer are both connected to the exact same Wi-Fi network — not one on 2.4GHz and the other on 5GHz if your router broadcasts both frequencies separately. Restart both your printer and your router, wait sixty seconds, then attempt the Add printer process again.
Printer shows as Offline despite being connected: Right-click your printer in the Printers and Scanners list and select See what’s printing. In the window that opens, click Printer in the top menu and ensure Use Printer Offline does not have a checkmark beside it. If it does, click it to remove the offline setting and restore normal operation.
Documents stuck in print queue: Open the print queue by clicking your printer in Printers and Scanners then clicking Open queue. Right-click any stuck document and select Cancel to remove it. If cancellation fails, stop the Windows Print Spooler service through Services in Task Manager, delete queue files from C:\Windows\System32\spool\PRINTERS, then restart the service.
Poor print quality on first pages: New printers and printers unused for extended periods often produce streaky or faded initial output as ink settles. Run the printer’s built-in head cleaning utility — found in the printer’s own software or through its front panel maintenance menu — before attempting quality-critical printing.
Driver installation fails repeatedly: Temporarily disable your antivirus software during driver installation, as security software occasionally interferes with driver installation processes. Re-enable antivirus immediately after successful installation.
Wireless Printing From Your Smartphone
Modern printers that support wireless connection also allow direct printing from Android and iPhone smartphones — no computer involvement required.
Android users: Install your printer manufacturer’s official app from the Google Play Store — HP Smart, Canon PRINT, Epson iPrint, or Brother iPrint&Scan. Open the app, allow it to detect your printer on the shared Wi-Fi network, and print documents, photos, and web pages directly from your phone.
iPhone users: Apple’s AirPrint technology allows printing directly from any iPhone or iPad to compatible wireless printers without installing any app. Open any document or photo on your iPhone, tap the Share button, select Print, choose your AirPrint-compatible printer from the detected list, and tap Print — it is genuinely that straightforward.
Keeping Your Printer Working Perfectly Long-Term
Successfully setting up a printer is the beginning of the relationship — maintaining it correctly ensures reliable performance for years.
Update printer drivers periodically through your manufacturer’s support website or through Windows Update — updated drivers frequently resolve compatibility issues and improve performance with newer operating systems.
For inkjet printers, run the head cleaning utility monthly if the printer is used infrequently — dried ink in print heads is the leading cause of inkjet print quality degradation over time.
Keep your printer powered on rather than unplugged when not in use — modern printers perform automatic maintenance cycles when idle that prevent ink drying and mechanical issues.
Store replacement ink cartridges or toner at room temperature away from direct sunlight — extreme temperatures degrade consumable quality before installation.
Conclusion — You Are Now a Printer Setup Expert
Setting up a printer used to feel like one of those computer tasks best left to someone who “knows about these things.” Cables that did not seem to do anything. Software that installed but made no difference. Wi-Fi connections that simply refused to appear.
That era is over for you.
You now know exactly how to connect a printer using every available connection method — USB cable for simplicity and reliability, wireless Wi-Fi for modern convenience and whole-home access, manufacturer software for complete feature access, and manual drivers for situations where automatic installation falls short.
You know how to print a test page, set your default printer, print from a smartphone, and solve every common problem that might ever arise. You have the complete knowledge framework that transforms printer setup from an anxiety-inducing mystery into a straightforward, manageable task you can complete confidently in under fifteen minutes.
Your printer is connected. Your first page is printed. And every page after this one will come just as easily.